Heb je mijn patroon gemaakt en foto’s geplaatst op sociale media? Ik vind het superleuk om te zien! Tag mij (@liefsvansuus_ op instagram en Liefs van Suus op Facebook) en gebruik de hashtag #suiderstrandshawl!
Did you make this pattern and post your pics on Social Media? I love seeing those! Be sure to tag me (@liefsvansuus_ on Instagram and Liefs van Suus on Facebook) and use hashtag #suiderstrandshawl!
Spanish pattern below! Patrón Español debajo!
Op Facebook en Instagram schreef ik nog dat ik niet wist wanneer ik voor het laatst een sjaal had gemaakt. Dat was natuurlijk onzin, bedacht ik me later. Deze winter nog maakte ik de heerlijke Choco & Sweaters sjaal (gratis patroon!) in een prachtige oranje roestkleur in Drops Nord. Maar sinds Corona in het land is en maart een eeuwigheid leek te duren en ook april drie jaar lijkt te beslaan, voelt die winter al een leven geleden. En dus werd het tijd voor een nieuwe sjaal. Een zomersjaal, welteverstaan!
On my socials I wrote that even though I started out making nothing else than shawls and wraps (and putting my family and friends in awkward positions giving them away left, right and centre), I couldn’t remember te last time I actually made a shawl. Which, turns out, was total nonsense. This Christmas, I absolutely did design a shawl; the Cinnamon and Sweaters shawl (free pattern!) and I still love it. I made it in a lovely rusty orange in the alpaca yarn Nord by Drops design. However, since Corona is among us and March felt like it lasted forever and April seems to be going that way as well, this winter feels like a lifetime ago. So it was time to make a new shawl. A summery shawlette, to be precise!

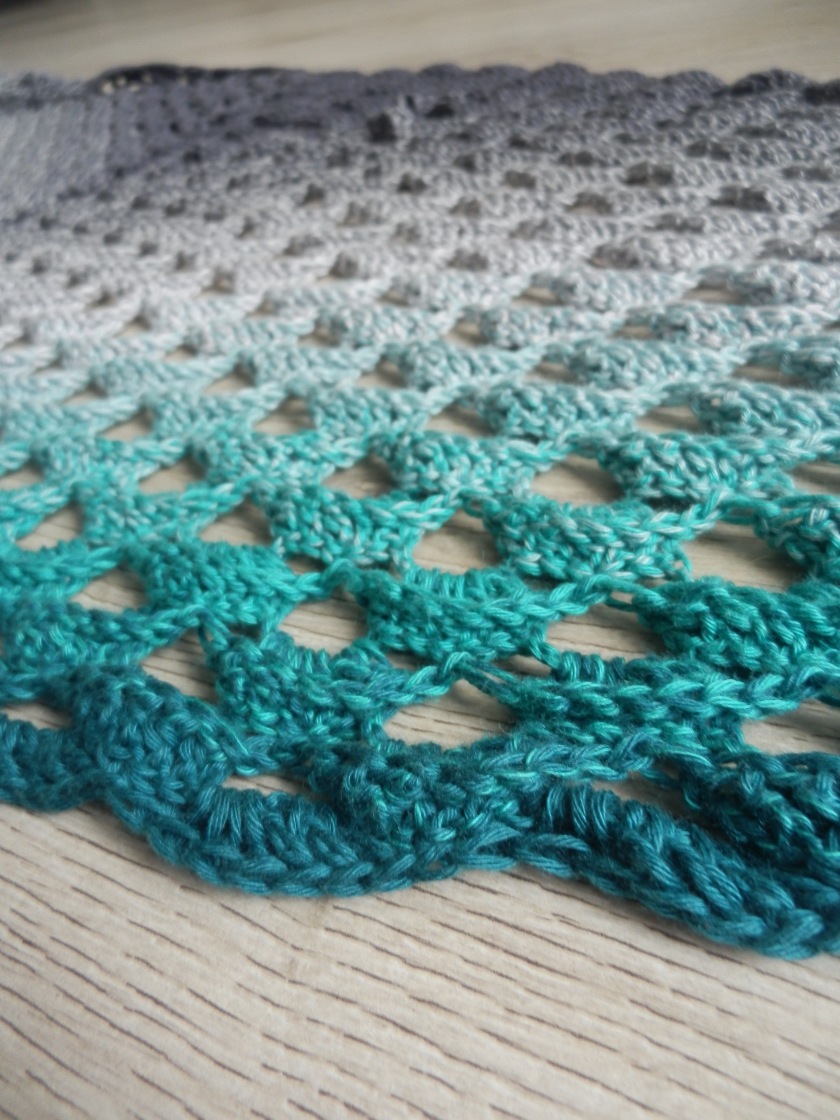
Om heel eerlijk te zijn werk ik eigenlijk nooit met verloopgaren of van die ‘cakes’. Ik weet eigenlijk niet waarom, want toen ik het Silk Degradé garen van Katia Concept in mijn Goodiebag vond na de yarntasting van Katia Yarns op de Kreadoe afgelopen oktober, jeukten mijn handen om er iets van te maken. Het is zulk prachtig garen! Het glanst en het voelt koel en glad en tegelijkertijd heel luxe. Ik vond wel meteen dat het echt een zomergaren was en dus besloot ik het voorlopig op te bergen in de kast.
To be honest, I never work with self-striping yarn or yarn cakes. I honestly don’t know why not, because once I found the Silk Degradé yarn of Katia Concept in my goodiebag after the yarntasting event of Katia Yarns last october, my entire body itched to make something of it. It’s such gorgeous yarn! It shimmers and it’s soft, sleek and cool, all the while maintaining it’s luxourious look. I did think it was a yarn that suited summer better, so I hid it away in my stash for better days.

De lente kwam en ook de quarantaine en in het zonnetje op het balkon of in de voortuin voelde ik het prikkelen om iets zomers te maken. En daar was de heerlijke bol Silk Degradé! Ik was eigenlijk helemaal niet van plan om zelf iets te ontwerpen. Een keer een patroontje van Pinterest leek me heerlijk makkelijk, tussen al dat ontwerpen door. Maar het bloed kruipt waar het niet gaan kan en toen ik een beetje bezig ging met een voorbeeldfoto, werd ik na vier toeren al kriegel en wilde ik er duizend dingen aan veranderen! En dat heb ik dus gedaan.
Spring came and so did quarantine and in the sun on my balcony or the front yard I felt the spring vibes tickle me to make something for summer. And hidden away inside my stash was the big cake of Silk Degradé! To tell you the truth, I wasn’t planning on designing something this time. I just wanted something nice and easy from Pinterest to do the job. But four rows in, everything inside of me screamed to change a hundred things about the picture I was working with. So I did.

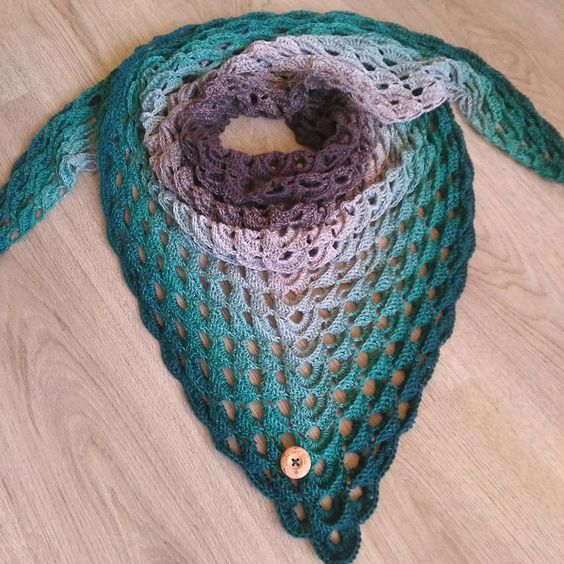
Ik woon in Den Haag, vlakbij het strand en er is niets dat ik fijner vind dan lekker door de duinen en over het strand wandelen of hardlopen. Ik vermijd het liefste de drukte van Scheveningen of Kijkduin, maar ga naar het Zuiderstrand, ook wel het Stille Strand genoemd. Hier is het heerlijk rustig en leeg, met hier en daar een fantastische strandtent. Dit Zuiderstrand mocht wel eens een mooie waardering van mij krijgen. Daarnaast houd ik van alliteratie. Het klinkt zo lekker als Alles Altijd Allitereert. En zo werd 1 en 1 uiteindelijk 2: de Suiderstrand Shawl was geboren!
I live in the seaside city of The Hague (“City of peace and justice”, just so you know 😉 ) and there’s nothing I love more than walking or running in the dunes or on the beach. I never go to the larger, touristy beaches in the area, but always go to the Zuiderstrand (Soutern beach), also known as the quiet beach. It’s wonderfully calm en peaceful, with a few great beach pavilions here and there. I figured it was time to honour this lovely beach in my designs. Add to that my love for alliteration and 1 plus 1 once again turns out to be 2: the Suiderstrand Shawl was born!

Voor deze sjaal heb je alleen een ‘cake’ nodig van minimaal 600m garen, een bijpassende haaknaald en natuurlijk een schaar en een naald om de losse eindjes in te steken. En dat is het! Het patroon bestaat uit 2 toeren die je steeds afwisselt, met om de 12 toeren een korte verandering, waar het patroon inspringt. Volg het geschreven patroon hieronder of het schema onderaan de pagina.
All the materials you need to make this shawl, are a yarn cake of at least 600m / 656 yards and a matching crochet hook. Of course, keep your scissors and sewing needle at the ready to cut and sew in ends as well. That’s it! This pattern basically consists of 2 repeating rows, with a little change every 12 rows. Follow the written instructions below or the chart at the bottom of the page.

De Suiderstrand Shawl
Afkortingen
- st = steek
- l = losse
- hv = halve vaste
- v = vaste
- stk = stokje
Het patroon
- 5l, beginnend in de 3e l vanaf je haaknaald: 3stk. 2l (deze 2l tellen nooit als stk), keer om.
- 2stk in de 1e st, 2stk in de volgende, 1stk in de laatste st. 2l, keer om.
- 2stk in de 1e st, 1stk in de volgende, 2stk in de volgende st, 1stk in de volgende 2 st. 2l, keer om.
- 1stk in de 1e st, 1l, 1 st overslaan, 1stk in de volgende, *1l, 1stk in de volgende* tot het einde. 2l, keer om.
- 1stk in de 1e st, 2stk in de volgende l, 1stk in de volgende st, 2stk in de volgende l. Vanaf hier 1stk in iedere volgende st. 2l, keer om.
- 1stk in de 1e st, *1l, 1st overslaan, 1stk in de volgende*. Herhaal van * tot * tot de laatste 3 st. 1l, 1stk, 1l, 1stk in de volgende st, 1l, 1stk in de laatste st. 2l, keer om.
- Herhaal nu rij 5 en rij 6 om en om. Let erop dat op de heengaande rijen (de rode rijen in het schema onderaan deze pagina) je altijd 1stk, 2stk, 1stk, 2stk haakt in de 1e 4 st. Op de teruggaande rijen (de zwarte rijen in het schema hieronder), haak je in de laatste 3 st altijd 1stk, met steeds 1l ertussen.
- Haak na rij 13 geen 2 keerlossen, maar 1. In rij 14: 6hv in de 1e 6st, 2l. Herhaal nu rij 6 weer, met 1stk, 1l, 1 st overslaan tot de laatste 3 st van de rij. In de laatste 3 st haak je 1l, 1stk, 1l, 1stk, 1l, 1stk. 2l, keer om.
- Wissel rij 5 en rij 6 weer met elkaar af. De kant waar je steeds meerdert, zal een beetje rond gaan lopen. Dit is normaal en de bedoeling.
- Alleen de 1e keer haak je na 13 rijen 6hv. Vanaf nu doe je dit steeds na 12 rijen. Dus wanneer je 6x rij 6 en 5 hebt gehaakt, haak je 1l, 6hv, 2l en begin je weer opnieuw met rij 6. Deze inspringende stukken vormen straks mooie punten in je sjaal.
- Wanneer je bijna aan het einde van je bol garen bent, haak je 1 rij v over de hele breedte van de sjaal. Hecht af en stop de losse draadjes in. Span nu je sjaal op. Het is belangrijk dat je dit doet, zo komt het patroon namelijk veel beter uit.
- Na het spannen en drogen is je sjaal klaar! Veel plezier ermee!

The Suiderstrand Shawl
Abbreviations
- st = stitch
- ch = chain
- slst = slip stitch
- sc = single crochet
- dc = double crochet
The pattern
- ch5, starting in the 2nd ch from hook: 3dc. ch2 (these ch2 never count as 1 dc), turn.
- 2dc in 1st st, 2dc in next, 1dc in last st. ch2, turn.
- 2dc in 1st st, 1dc in next, 2dc in next st, 1dc in next 2 st. ch2, turn.
- 1dc in 1st st, ch1, skip 1 st, 1dc in next. *ch1, 1dc in next st* to the end. ch2, turn.
- 1dc in 1st st, 2dc in next ch1, 1dc in next st, 2dc in next ch 1. From here on make 1dc in each st. ch2, turn.
- 1dc in 1st st, *ch1, skip 1 st, 1dc in next st*. Repeat from * to * until you reach the last 3 st of the previous row. Now ch1, 1dc in next st, ch1, 1dc in next st, ch1, 1dc in last st. Ch2, turn.
- Repeat row 5 and 6 alternately. Keep in mind that the rows going forward (the red rows in the chart), always start by 1dc, 2dc, 1dc, 2dc in the 1st 4 st. On the rows backward (the black ones in the chart), you dc in each of the last 3 st, seperating those dc with a ch1.
- After 13 rows: do not ch2. Ch1. In row 14: 6slst, ch2. Now repeat row 6, making 1dc, ch1, skip 1 st until the last 3 st of the row. 1dc, ch1, 1dc, ch1, 1dc in those last st. Ch2, turn.
- Repeat row 5 and 6 again alternately. The side you increase on, will slowly start to curl into a sort of half circle. This is normal and exactly what needs to happen.
- Once you’ve made the 6slst the first time after 13 rows, for the rest of the shawl you will start the 6slst and row 6 repeat after 12 rows. So everytime you’ve made 6 rows of row 6 and 6 rows of row 5, ch1, 6slst, ch2 and repeat row 6. These slst will form the pointy edges of your shawl.
- When you’ve nearly reached the end of your skein, make 1 row of sc on the edge of your shawl. Yarn off and weave in all ends. Then block your shawl. It is important to do so, as the pattern will be exponentially more pretty.
- After blocking and drying, your shawl is done! Have fun wearing it!
The Suiderstrand Shawl
Abreviaciones
· Pto(pts) = punto(puntos)
· Cad = cadeneta
· pe = punto enano
· pb = punto bajo
· pa = punto alto
El Patrón
- 5cad, empezando en la 2ª cad desde el ganchillo: 3pa. 2cad (estas 2cad nunca cuentan como 1 pa), girar la labor.
- 2pa en 1er pto, 2pa en el siguiente pto, 1pa en el ultimo pto. 2cad, girar.
- 2pa en 1er pto, 1pa en el siguiente, 2pa en el siguiente pto, 1pa en siguientes 2 pts. 2cad, girar.
- 1pa en 1er pto, 1cad, saltar un pto sin tejer, 1pa siguiente pto. *1cad, saltar un pto sin tejer, 1pa en siguiente pto* hasta el final. 2cad, girar.
- 1pa en 1er pto, 2pa en siguiente cad, 1pa en siguiente pto, 2pa en siguiente cad. Desde aquí tejer 1pa en cada pto. 2cad, girar.
- 1pa en 1er pto, *1cad, saltar 1 pto sin tejer, 1pa en siguiente pto*. Repetir desde * a * hasta llegar a los últimos 3 pts de la vuelta anterior. Ahora 1cad, 1pa en siguiente pto, 1cad, 1pa en siguiente pto, 1cad, 1pa en ultimo pto. 2cad, girar.
- Repetir vueltas 5 y 6 alternándolas. Tener en cuenta que las siguientes vueltas (las vueltas rojas en el diagrama), empiezan siempre con 1pa, 2pa, 1pa, 2pa en los primeros 4 pto. En las vueltas del revés (las negras en el diagrama), tejer 1pa en cada uno de los últimos 3 pts, separando esos pa con una cad.
- Despues de 13 vueltas: no hacer 2cad. 1cad. En la vuelta 14: 6pe, 2cad. Y a partir de aquí repetir vuelta 6, haciendo 1pa, 1cad, saltar un pto sin tejer hasta los últimos 3 pts de la vuelta anterior. 1pa, 1cad, 1pa, 1cad, 1pa en esos 3 últimos pts. 2cad, girar.
- Repetir vueltas 5 y 6 de nuevo alternándolas. El lado en el que hacemos aumentos, empezará a curvarse lentamente formando un semicírculo. Esto es normal y es exactamente el efecto que buscamos.
- Una vez hechos los 6pe la primera vez después de 13 vueltas, para el resto del chal empezarás 6pe y vuelta 6 repitiendo cada 12 vueltas. Con lo que la secuencia de repetición de vueltas será: 6 pasadas de la vuelta 6 y 6 pasadas de la vuelta 5, 1cad, 6pe, 2cad y repetir vuelta 6. Estos pe formarán los bordes puntiagudos del chal.
- Cuando estés cerca de terminar el ovillo, hacer 1 vuelta de pb en el borde del chal. Cerrar la labor y rematar los cabos sueltos. Entonces ya puedes bloquear el chal. Es importante hacerlo, así lucirá las bonito.
- Despues de bloquearlo y dejarlo secar, ¡ya tienes tu chal hecho! ¡Disfrutalo y pontelo siempre que quieras!

Heb je mijn patroon gemaakt en foto’s geplaatst op sociale media? Ik vind het superleuk om te zien! Tag mij (@liefsvansuus_ op instagram en Liefs van Suus op Facebook) en gebruik de hashtag #suiderstrandshawl!
Did you make this pattern and post your pics on Social Media? I love seeing those! Be sure to tag me (@liefsvansuus_ on Instagram and Liefs van Suus on Facebook) and use hashtag #suiderstrandshawl!