Geplaatst in crochet, Haken, How to, Patronen, patterns, Top

Tuberose Tunique

Ergens op een Catalaanse bergtop afgelopen januari kreeg ik ineens een inval: ik wilde een zomerse top ontwerpen. Iets met granny squares. Want ook al heb ik ooit beweerd dat ik helemaal niets met het haken van die vierkantjes heb, ineens moest en zou ik er iets mee maken. Je weet wel hoe dat gaat (toch?).

Somewhere on a Catalan mountain top last January, it came to me: I would design a summer top. Something with lovely granny squares. Because even though I once claimed not to be too impressed by crocheting those squares, all of a sudden I simply had to work with them. You know how that goes (right?).

IMG_20190302_135808822-01

Drie jaar geleden maakte ik een heerlijke kimono met het prachtige Sunkissed garen van Scheepjeswol. Dat vest is nog altijd één van mijn favoriete handgemaakte kledingstukken. En dat komt mede door het garen. Het is zo heerlijk licht en luchtig en de wassing maakt het geweldig zomers. En dus wist ik al snel dat ik ook voor deze nieuwe zomerse top wilde werken met Sunkissed. Alleen die naam al, hoeveel zomerser wil je het hebben?

Three years ago I finished a wonderful kimono that I made with the gorgeous Sunkissed yarn by Scheepjes. To this day, that cardigan is one of my favourite hand made items hanging in my closet. And for a large part that’s because of the yarn. It’s so wonderfully light and airy and the fade on the colours makes it extra summer-y. So it was clear from the get go that I had to make this new top in Sunkissed. The name alone – it doesn’t get more summer than that!

IMG_20190330_110657999_HDR-01

Het ontwerpen van granny squares is niet makkelijk en het digitaliseren van het ontwerp al helemaal niet. Als iemand een geweldige tip heeft voor een fijn online programma waarin je vierkantjes mooi kunt tekenen, houd ik me aanbevolen. Maar het is gelukt. Het patroon is geschreven, mijn testers hebben wederom hun best gedaan en ik kan niet anders zeggen: ik ben trots!

Designing granny squares is everything but easy and digitalising the design is possibly even worse. If anyone has the golden tip for a clear, coherent and workable online programm that lets you draw clear squares, I’m here for it. However, I did it. The pattern has been written, my testers yet again have done a wonderful job and I can’t say anything else than: I’m quite proud!


Het leuke van dit patroon is dat je alle kleuren volledig naar eigen inzicht in kunt delen. Streepjes, blokken, of juist effen? Het kan allemaal! En het ALLERLEUKSTE is dat je kunt kiezen uit drie verschillende soorten mouwen. Mouwloos, een kapmouwtje of juist een langere, wijde mouw? Het staat allemaal beschreven in het patroon. Daarnaast komt het patroon in maar liefst zes maten! Van XS tot XXL. Voor ieder wat wils dus! Iedereen kan een Tuberose Tuniek voor zichzelf maken!
(of, natuurlijk, voor je buurvrouw, zus, moeder of uitzonderlijk dikke kat)

The fun part about this pattern is that it’s completely up to you how you’d like to use colours. Would you like to make stripes, blocks or rather work one solid colour? It’s all possible! And the VERY BEST PART is that you get to choose between three different kind of sleeves. Would you like your tunique to be sleeveless, sport a nice cap sleeve or will you go for a longer, wider sleeve? All instructions are in the pattern. Furthermore, this pattern comes in six sizes! Yes, you heard that correctly; six! From XS to XXL. So everyone can make a Tuberose Tunique for themselves!
(or, of course, your neighbour, sister, mother or extraordinarily fat cat)

IMG_20190328_095423600-01

Voor het patroon in mijn Ravelry winkel klik je HIER
Voor het patroon in mijn Etsy winkel klik je HIER

To find the pattern in my Ravelry store, click HERE
To find the pattern in my Etsy store, click HERE

IMG_20190519_171134_659

Geplaatst in crochet, Haken, Patronen, patterns, Trui / sweater

The Whole Zoo – Zebra Jumper

Ken je dat? Dat je hard aan het werk bent aan een project en je in hoofd het volgende al aan het plannen bent? Je hebt al garen, je hebt al ideeën en eigenlijk is je huidige project niets meer dan een sta-in-de-weg voordat je aan iets nieuws kunt beginnen. Dat had ik ook met deze trui. Ik wist dat de The Whole Zoo – cardigan fantastisch zou worden en ik wist dat ik het patroon ervoor af móest maken, maar het liefste wilde ik aan deze zebrastrepen beginnen.

You’re hard at work on a project that you love, but still you can’t keep your head from dreaming of future projects. You have already thought of what yarn to use and to be perfectly honest, your current work in process is nothing more than an annoying delay before you can start something new. Sounds familiar? It’s what I experienced while working on the The Whole Zoo – cardigan. Even though I loved it and I knew I had to finish up the pattern for it first, I’d much rather started working on these zebra stripes!

IMG_20190222_152924633-01

En zo ontstond het tweede item in mijn The Whole Zoo – collectie; de zebra trui! In een webwinkel was ik een trui tegengekomen met een diepe V in de rug en dat leek me fantastisch om te maken. Iets nieuws, iets origineels, iets totaal anders! En dan die strepen. Zebra strepen. Hoe zagen die er nou eigenlijk uit? Hoe maak je zoiets? Pinterest was wederom mijn vriend. De strepen ontstonden, het garen was al heel snel uitgezocht en binnen de kortste keren ontstond zo de Zebra trui: vrolijk, hip en ongelooflijk leuk!

That’s how my second item for my The Whole Zoo – collection came to be; the zebra jumper! In a webshop I had seen a sweater with a deep V in the back and it was there that the idea came to me to try and make something like that myself. Something new, something original, something completely different! Than I landed on the stripes. Zebra stripes. How did those actually look? How do you make something like that? Thankfully, Pinterest came to the rescue once again. The stripes came to life, the yarn was chosen easily and with the blink of an eye (of a couple, but still) the Zebra jumper saw the light: happy, hip and incredibly fun!

IMG_20190223_123444882-01

Deze trui haak je op naald 5 of 4,5, afhankelijk van hoe strak je haakt en wanneer je kiest voor Yarn & Colors Charming of Scheepjes Stonewashed, krijg je dat heerlijke vervaagde effect wat de trui net dat beetje extra geeft. De trui is gemaakt om een beetje wijd te vallen. Het patroon komt in vijf verschillende maten, van XS tot en met XL en de zebrastrepen maak je aan de hand van een schema. Weet je niet hoe de kleurwisselingen precies moeten of wat je moet doen met het garen wat je tijdens de strepen niet gebruikt? Geen zorgen, in het patroon leg ik het allemaal uit!

For this sweater you’ll need a crochet hook size 5 or 4,5, depending on how tight you crochet. Go for Yarn & Colors Charming of Scheepjes Stonewashed yarn to create that wonderfully faded effect that gives this jumper that tiny bit more oomph. The jumper is designed to have a loose fit. The pattern comes in five sizes, ranging from XS to XL and you will make the zebra stripes with an attached chart. Feeling a bit apprehensive about how to make the colour changes or in doubt over what to do with the yarn you’re not using while creating the stripes? Don’t worry, I will explain everyting in my pattern!

IMG_20190222_154048_617

Natuurlijk heb ik het patroon ook dit keer weer laten testen door een aantal fantastische dames! Zij hebben stuk voor stuk geweldig werk geleverd. Hun feedback was ontzettend nuttig en ik vind het altijd fantastisch om te zien hoe mijn patroon tot leven komt in de handen van andere creatievelingen. En wat ziet de Zebra Jumper er geweldig uit in andere kleurtjes! Wat is hij leuk in groen, zalmroze en rood!

Of course, I had the pattern tested by a couple of wonderful ladies. Each of them has delivered an amazing piece of work. Not only was their feedback immensly useful, it makes me so happy to see how my pattern comes to life in the hands of other creative souls. And just how gorgeous does the Zebra jumper look in other colour combinations! How amazing it is in green or peach or red!

Welke kleurtjes kies jij voor deze trui? Het patroon in mijn Ravelry store kun je vinden door HIER te klikken. Voor mijn Etsy shop klik je HIER. Vergeet vooral niet mij te taggen wanneer je een foto van je werk deelt op instagram (@liefsvansuus_) en gebruik #thewholezoozebrajumper. Veel plezier!

What colours will you use for this jumper? To find the pattern in my Ravelry store, click HERE. To go to my Etsy shop, click HERE. Don’t forget to tag me when sharing a pic of your project on Instagram (@liefsvansuus_) and use #thewholezoozebrajumper. Have fun!

Geplaatst in Cardigan / Vest, crochet, Haken, Patronen, patterns

The Whole Zoo – Cardigan

In mijn vorige blog schreef ik al over mijn enorme liefde voor dierenprints. En hoe deze liefde heeft geleid tot het idee om een hele collectie aan dierenprintpatronen (3 keer woordwaarde): The Whole Zoo – collectie. Want; ‘forget butterflies, I feel the whole zoo when I’m with you!’. Oftewel: vergeet vlinders, ik voel de hele dierentuin bij jou.

In my last blogpost, I wrote about my love for animal prints. It is this love that led me to the idea to create an entire collection of animal print patterns: The Whole Zoo – collection. Because: ‘forget butterflies, I feel the whole zoo when I’m with you!’

IMG_20190211_121756295-01

Vandaag presenteer ik met trots het eerste patroon uit deze collectie: het panterprint vest! Een heerlijke zacht, pluizig, warm, knus vest met panterprint banen over ieder pand. Eigenlijk precies wat je kledingkast nog miste, waarvan je nooit wist dat je het miste!

So today I proudly present the first pattern in this collection: the leopard print cardigan! A lovely warm, plush, soft, cozy cardigan with leopard print parts on each panel. It is pretty much everything your wardrobe needed, that you never knew it needed!

Ik heb het patroon laten testen door allemaal fantastisch lieve dames die stuk voor stuk fantastisch mooie vesten hebben gemaakt. Met hun feedback heb ik het patroon zo gemaakt dat het duidelijk en overzichtelijk is. En het resultaat er dus mag zijn!

A few lovely ladies took up the challenge to test my pattern and each of them made wonderfully lovely cardigans. With their helpful feedback, I’ve made this pattern clear, workable and coherent. And their results are too good to keep from you!

Klik HIER om naar het patroon in mijn Ravelry store te gaan en HIER om naar mijn ETSY shop te gaan.

Click HERE to find the pattern in my Ravelry store and HERE to go to my Etsy shop.


Geplaatst in Blog, crochet, Haken, Trui / sweater

Zoo-topia

Ik ben niet enorm modebewust. De meeste trends begin ik pas een beetje op prijs te stellen wanneer ze al lang en breed op hun retour zijn. Maar de dierenprintjes heb ik redelijk snel ontdekt en laat ik dit zeggen; ik ben er gek op. Panterprintjes, zebrastrepen, slangenpatronen… Je kunt het me niet gek genoeg maken.

I’m not a born fashionista. I usually only start appreciating trends once they’re already half-way out of the door. However, animal prints were on my radar quite quickly. And let me tell you this: I simply love them. Leopard prints, zebra stripes, snake patterns… You name it and I love it.

IMG_20190127_151019_465

En als haakster was het eerste wat ik dacht natuurlijk: dat wil ik kunnen haken! Want het enige dat leuker is dan geweldige panterpatronen uit de winkel, zijn geweldige panterpatronen die van je eigen naald glijden. En dus spitte ik Pinterest door, zocht ik Ravelry en Instagram af op zoek naar inspiratie en pakte ik er puntje bij paaltje maar gewoon naald en garen bij en probeerde maar wat. En zie; PANTERPRINT!

As crocheter, the first thing I thought was, of course: I want to be able to crochet that! Because there is only one thing better than awesome leopard prints from the shops: awesome leopard prints handmade! So I started delving into Pinterest, searching through Ravelry and Instagram to look for inspiration. After a while I just took up my hook and yarn and tried something out. And lo and behold: LEOPARD PRINT!

IMG_20190205_105403424-01

Toen ik de panterprint eenmaal onder de knie had, liep mijn hoofd alweer over met andere ideeën en nog voordat het patroon van het pantervest goed en wel af was, had ik alweer allemaal plannen voor een nieuwe trui. Met zebrastrepen dit keer! Opnieuw werd Pinterest erbij gepakt en wederom probeerde ik het uiteindelijk gewoon maar zelf. En zo ontstond het zebrapatroon. En het werd nog veel leuker dan ik voor mogelijk had gehouden!

Once I mastered the leopard print, my head was already bubbling over with new ideas and even before I had finished the pattern for my leopard print cardigan, new plans formed for a new jumper. I’d make one with zebra stripes this time! Once again, I did a deep dive into Pinterest and once again I ended up just trying out something by myself. This is how I ended up with the zebra pattern. And it turned out even more amazing than I could ever have envisioned!

IMG_20190215_084508_454

Ik besloot dat ik nog lang niet klaar was met alle heerlijke dierenprintjes. Ik ga er een hele collectie van maken! Ik noem het The Whole Zoo – collectie, van de quote: Forget butterflies, I feel the whole zoo when I’m with you (vergeet vlinders, ik voel de hele dierentuin bij jou). Er komen fantastisch hippe, vrolijke ontwerpen in deze collectie die helemaal van nu zijn. Binnenkort komen de eerste 2 patronen al: Het pantervest en de zebratrui. Hou het in de gaten!

I decided that I was far from done with all these lovely animal prints. So I will make a collection out of it! I will call it The Whole Zoo – collection, from the quote: Forget butterflies, I feel the whole zoo when I’m with you. The collection will feature trendy, fun designs that are very contemporary. Very soon the first 2 patterns will be released: the leopard print cardigan and the zebra print sweater. Stay tuned!


Geplaatst in crochet, Haken, Patronen, patterns, Sjaals / shawls

Pattern addict

pinterest

Ik ben gek op Pinterest en Instagram om nieuwe ideeën op te doen. Op mijn Pinterestbord (dat ik heel origineel ‘haken’ heb genoemd) heb ik duizenden foto’s bewaard die mij allemaal inspireren om iets nieuws te proberen, een trui te haken, een nieuwe steek te testen, een sjaal te ontwerpen. Ik heb inmiddels zoveel ideeën bewaard, dat ik nog honderd jaar zou moeten leven om ze allemaal te kunnen proberen.

I love Pinterest and Instagram for providing me with new ideas. On my Pinterestboard (aptly named ‘haken’ which means crochet) I have saved thousands of photos that all inspire me to create something new, try out new stitches, design new things, make, make make. I have saved so many ideas that I’d have to live at least a hundred years more to be able to give them all a try.

img_20190103_125017351[1]

Eén van de haaksteken die ik maar bleef pinnen, was de Jasmijnsteek. Een prachtige, fluffy, gebloemde steek die me leek te roepen. Ik móest hem simpelweg gaan verwerken in een patroon. Zelfs al had ik hem al een stuk of vijf keer geprobeerd en kwam ik er maar niet uit.

En dus ging ik er eens echt goed voor zitten, zette ik drie verschillende YouTube tutorials op repeat en kwam ik er ineens uit! En toen ik de steek eenmaal door had, kon ik niet meer stoppen. De Jasmijnsteek was zo mooi en luchtig en delicaat! En dus schreef ik er een patroon mee. De Petunia Infinity sjaal was geboren. Omdat ik wist hoe onduidelijk ik de meeste schema’s of uitleg vond die ik online had gevonden, heb ik een volledig nieuwe, uitgebreide fototutorial geschreven. Zodat iedereen die mooie Jasmijnsteek ook kan maken!
(scroll naar beneden voor de links naar mijn shops om het patroon te bemachtigen)

One of the crochet stitches that I kept ‘pinning’, was the Jasmine stitch. Such a lovely, fluffy, floral stitch. It seemed like it kept calling my name. I simply had to work it into a pattern. Even if I had already tried to make it up to five time and kept failing.

So I set myself down to the job, opened 3 different YouTube tutorials and all of a sudden, there it was! When I understood the stitch, I simply couldn’t put my hook down anymore. The Jasmine stitch was just so pretty and airy and delicate! And so I wrote a pattern using it. The Petunia Infinity Scarf was born. With my difficulty in understanding the stitch using charts or written instructions, I made a completely new photo tutorial. Now everyone can make that lovely Jasmine stitch for themselves!
(scroll down for the link to my shops to get the pattern for this lovely scarf!)


Nog zoiets moois dat ik afgelopen jaar voor het eerst probeerde, was mozaïek haken. Ik had het al eerder gezien, natuurlijk, en het net zo snel aan de kant geschoven als ‘niets voor mij’. Maar toen ik het eenmaal probeerde… Oh boy, wat werd het prachtig! Ik volgde dit YouTube filmpje om de steek onder de knie te krijgen. Ooit zag ik een prachtige groen/roze met zwarte sjaal in de winkel en als iedere enthousiaste haakster dacht ik natuurlijk: ‘Die kan ik met veel meer moeite en voor veel meer geld zelf maken!’

Another gorgeous little thing that I tried for the first time last year, was interlocking crochet. I had seen it before, of course, but put it aside as ‘not something for me’. But once I tried it… Oh boy, how pretty it turned out to be! I followed along with this YouTube clip to get this stitch. A long time ago, I saw a beautiful pink/green and black scarf in a shop and like every enthusiastic crocheter I thought: ‘That I can make myself with a lot more effort and for so much more money!’


Ik kan één ding van mozaïekhaken zeggen: het is opletten. Het tomeloos, gedachteloos haken van sommige patronen, waar ik juist zo van kan genieten, is er met mozaïekhaken niet bij. Iedere steek, iedere toer is het weer opletten. Daarom duurde deze sjaal ook zo lang om te maken. Ik ben er ergens in augustus mee begonnen, met het idee dat ik hem dan ruim voor de eerste kou wel af zou hebben. Het is inmiddels januari, maar goed. Hij is wel af!

One thing I can say for interlocking crochet: you have to pay attention. The sweet, mindless crocheting that some patterns allow and that I love so much, doesn’t apply to interlocking crochet. You have to pay attention to every stitch, every row. That’s why this scarf took me so long to accomplish. Somewhere in August I started with the first stitch, thinking that I’d have it finished way before the first cold would set in. It’s January right now, but oh well. It’s done!


Het patroon van de Petunia Infinity sjaal is te vinden in mijn Ravelry shop of mijn Etsy winkel.

The pattern for the Petunia Infinity scarf is available through my Ravelry shop or my Etsy store.

Geplaatst in Geen categorie

Doily Jumper

Ik maakte hem afgelopen maart al: de Doily Jumper. Ik had prachtig, knalblauw garen mee naar huis genomen en hoewel ik nog geen idee had wat ik ermee ging maken; ik móest ermee werken. En dus haakte ik een proeflapje. Dat groeide en groeide en uiteindelijk uitgroeide tot een trui. Toen mijn zusje mij erin zag lopen zei ze: ‘Je weet dat je je steeds meer als een kanten servetje gaat kleden, hè?’ En toen wist ik ook hoe ik de trui zou noemen. Doily, naar het Engelse woord voor kanten kleedje.

This one I already finished last March; The Doily Jumper. I bought gorgeous, bright blue yarn and even though at the time I hadn’t a clue yet as to what to make of it, I knew that I simply had to work with it. And so I started with something, just for fun. That something grew and grew and as by magic, eventually turned into a sweater. When my sister saw me wearing it, she said: ‘You do realise you dress more and more like a doily, don’t you?’ And that’s when the name was born: The Doily Jumper.

IMG_20180321_105827_659   IMG_20180323_104010_925

Ik begon met het patroon uitschrijven, maar liet het erbij zitten toen ik afgeleid raakte door honderdduizend andere fantastische projecten. En toen ik het patroon er afgelopen maand weer bij pakte om uit te werken, had ik daar spijt van. Wat een zooitje was het! En wat is het moeilijk om ergens weer middenin te vallen, aanpassingen te maken waar je niet precies zicht meer op hebt. Ik haakte een tweede versie voor mijzelf, schreef het patroon opnieuw uit, maakte berekeningen voor grotere en kleinere maten en hoopte dat ik het zo voor elkaar had.

I started writing down the pattern, but forgot about it when I got distracted by all the thousands of other wonderful things to crochet. So when I picked up the pattern last month, I horribly regretted that. It was an absolute mess! And it is so hard to try and pick something up from the middle once you’re in a completely different state of mind! I made a second version for myself, wrote down the pattern again, made calculations for the bigger and smaller sizes and hoped that I did it, in the end.

IMG_20181113_110753_210


Niets was minder waar. Mijn testers gingen enthousiast met het patroon aan de slag en (ik overdrijf hier uiteraard een beetje) ALLES MOEST ANDERS! Ik kan gerust zeggen dat ik een beetje gek ben geworden van dit patroon en dat ik het regelmatig uit het raam wilde smijten. Maar dan zag ik mijn prachtige trui weer en dacht ik; Nee, het is te mooi om gewoon te laten liggen.

Oh boy, was I proven wrong. My testers started workin with the pattern and (I’m only exaggerating a tiny bit here) EVERYTHING HAD TO CHANGE! I can honestly say this pattern did my head in. There were plenty of times that I wanted nothing more than just toss it out of the window. But then I looked at my own lovely jumper again and thought; No, it’s to pretty to just left unfinished.

Dus hier is het: de verbeterde versie van de Doily Jumper! Voor iedereen, om overal te dragen. Het is een superleuk, gemakkelijk projectje, dat je snel afrondt en dat slechts 700 tot 1300 meter garen vraagt. Gebruik Scheepjes Colour Crafter of bijvoorbeeld Stylecraft Special DK. Pak je 5mm of je 5,5mm haaknaald erbij (afhankelijk van de stekenverhouding) en ga aan de slag met je eigen prachtige Doily Jumper! Het patroon vind je in mijn Ravelry store door HIER te klikken! Voor mijn Etsy store, klik HIER!

And so here it is: the new and improved pattern of the Doily Jumper! Made for everyone, perfect to wear anywhere. It’s a super fun project, quickly made and only asks for 700 – 1300 meters of DK yarn. Grab your 5 mm or 5,5 mm hook (depending on gauge) and make your own! You can find the pattern in my Ravelry store by clicking HERE! For Etsy, click HERE!

IMG_20181020_114213_175

Geplaatst in Geen categorie

The Snowstorm Set

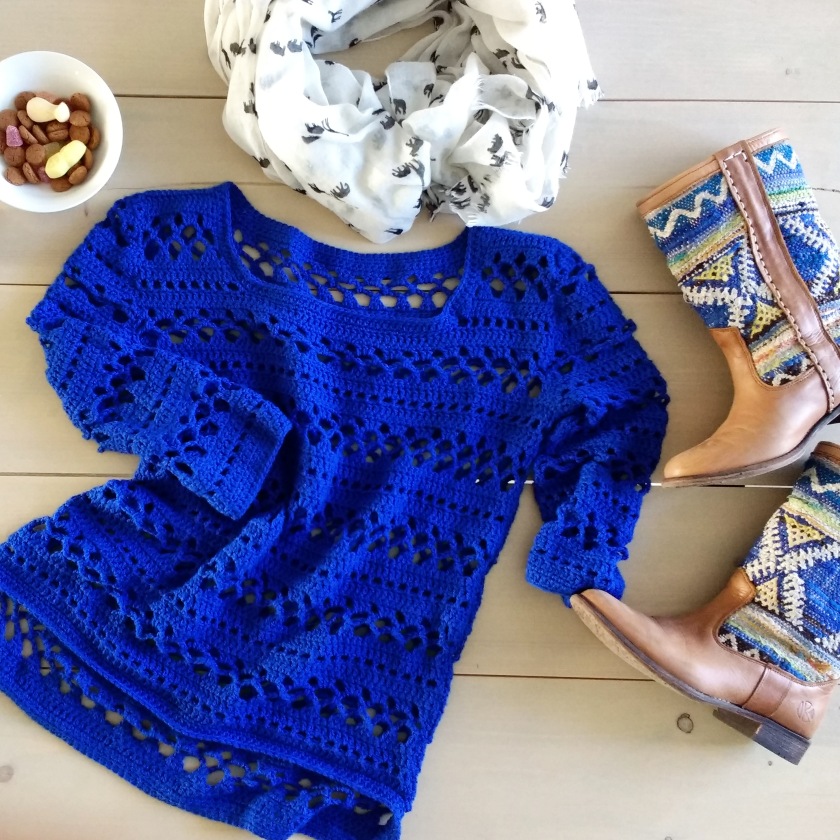
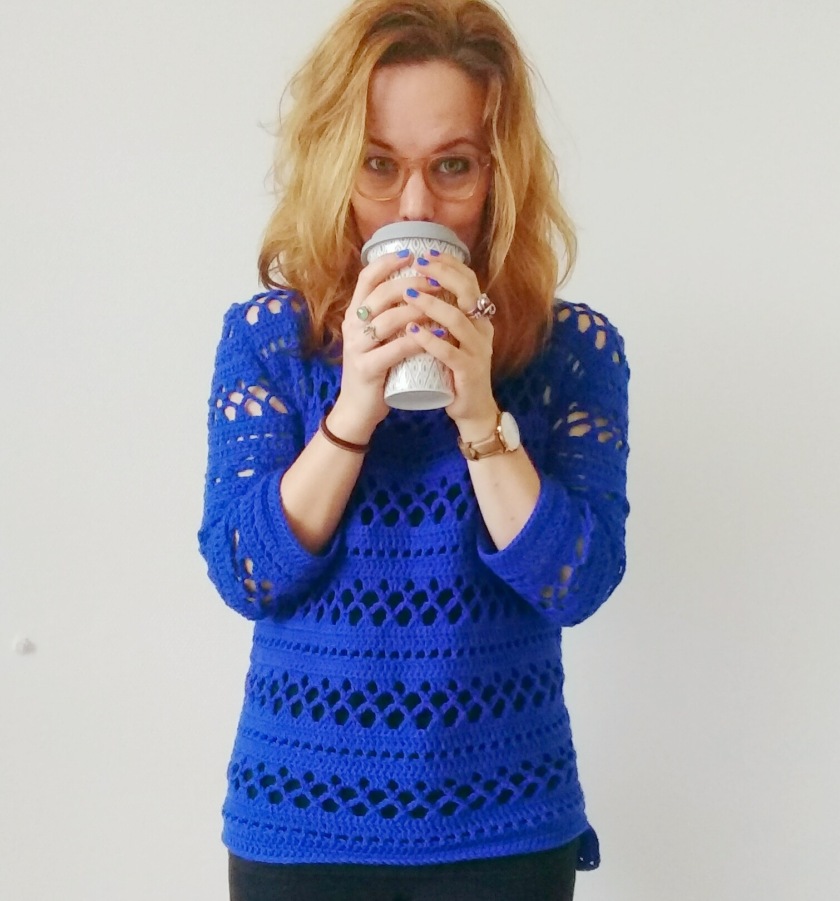
Deze post is een samenwerking met hobbii.nlthis post is a collaboration with hobbii.nl

Piet Paulusma voorspelt een horrorwinter, las ik op internet. Temperaturen kunnen dalen tot -20, is zijn voorspelling. En dat is even schrikken, na de lange hete zomer! Gelukkig heeft Piet het wel vaker bij het verkeerde eind, maar stel nou dat het echt zo koud wordt… Dan kun je je daar als handige Harry uitgebreid op voorbereiden!

A Dutch weatherman predicted this week, that we might just face a horror winter this year. Temperatures could drop to minus 20 degrees, he said. And I know that for a lot of you folks out there, minus 20 degrees Celcius is childs’ play. But for us soft hearted Dutchies, it’s tough. Thankfully, the weather forcasts are wrong more often than they’re right, but still… If the cold sets in, at least there is a way to prepare for the big freeze!

IMG_20181027_151400_249

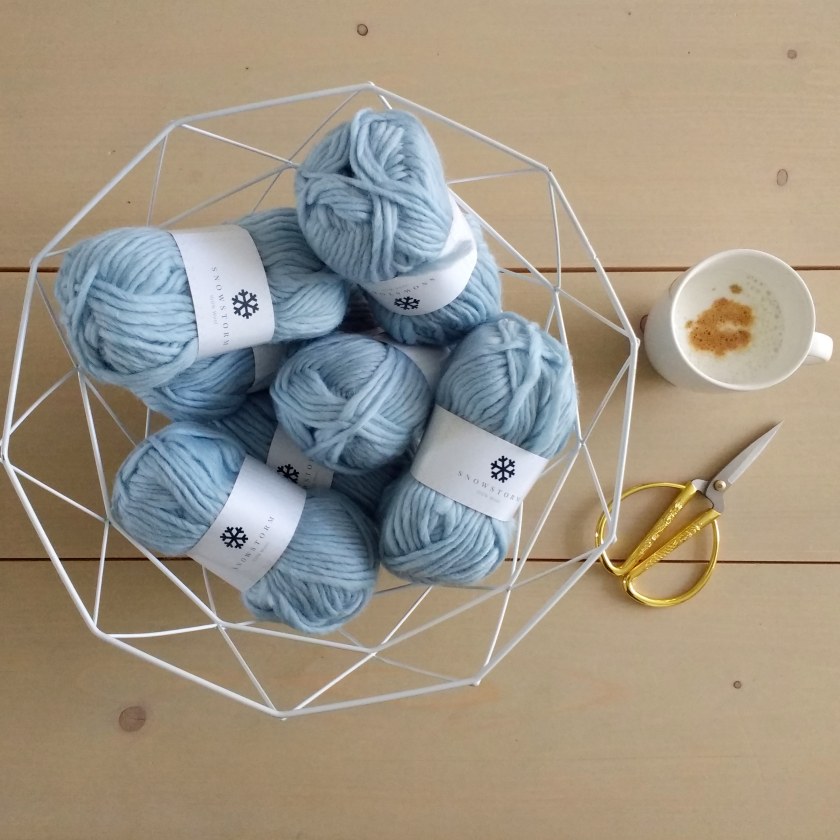
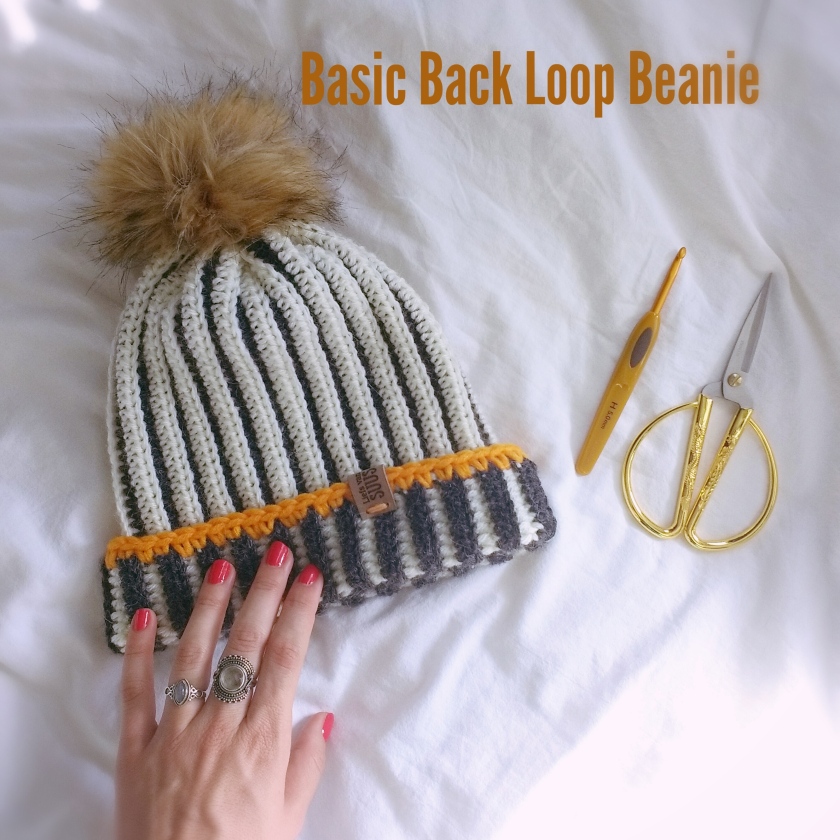
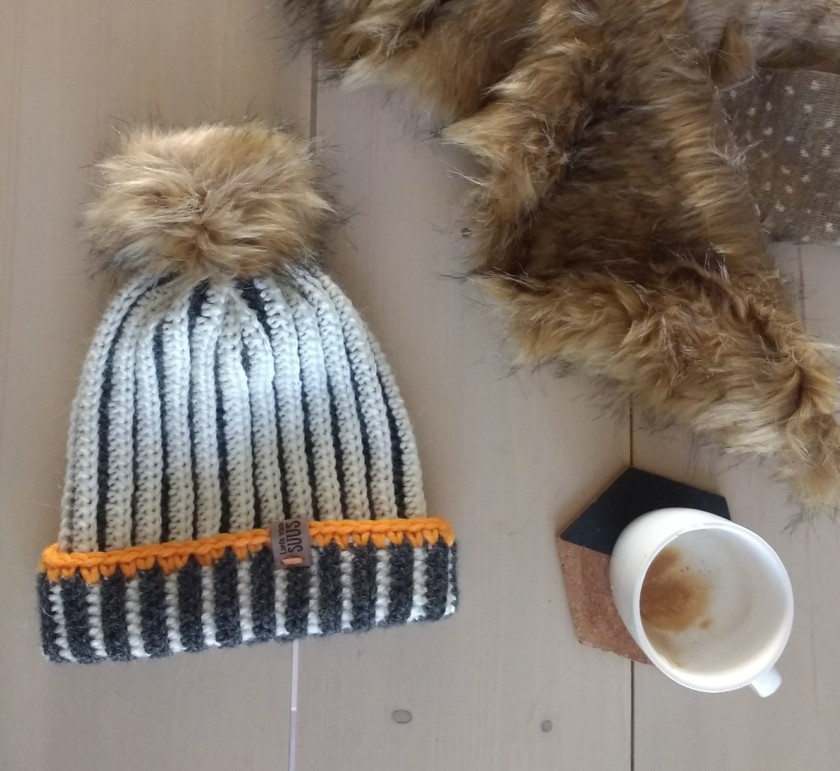
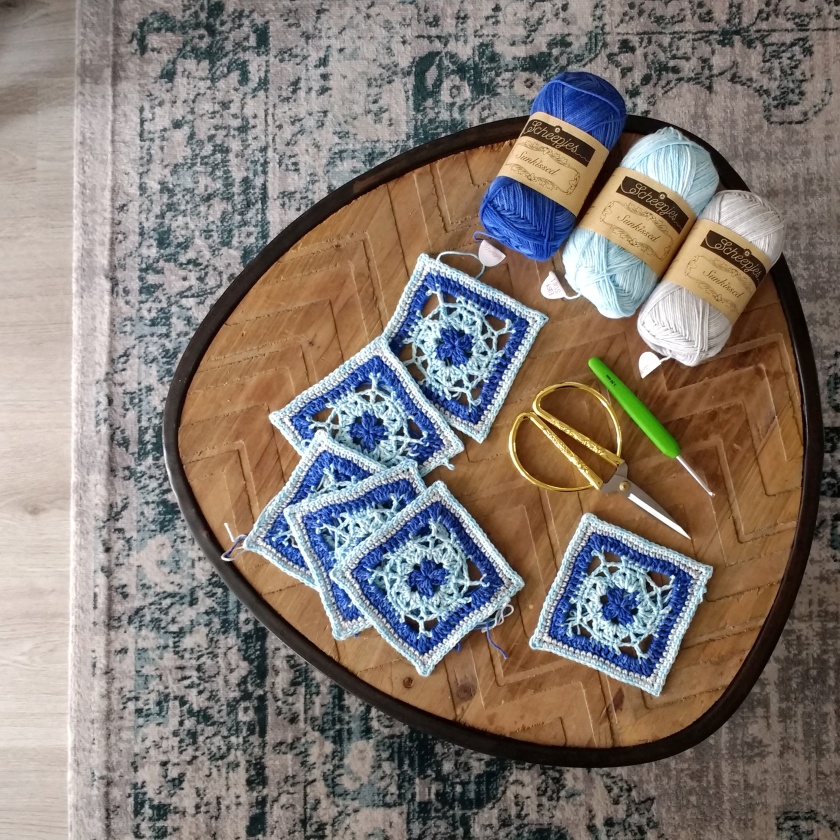
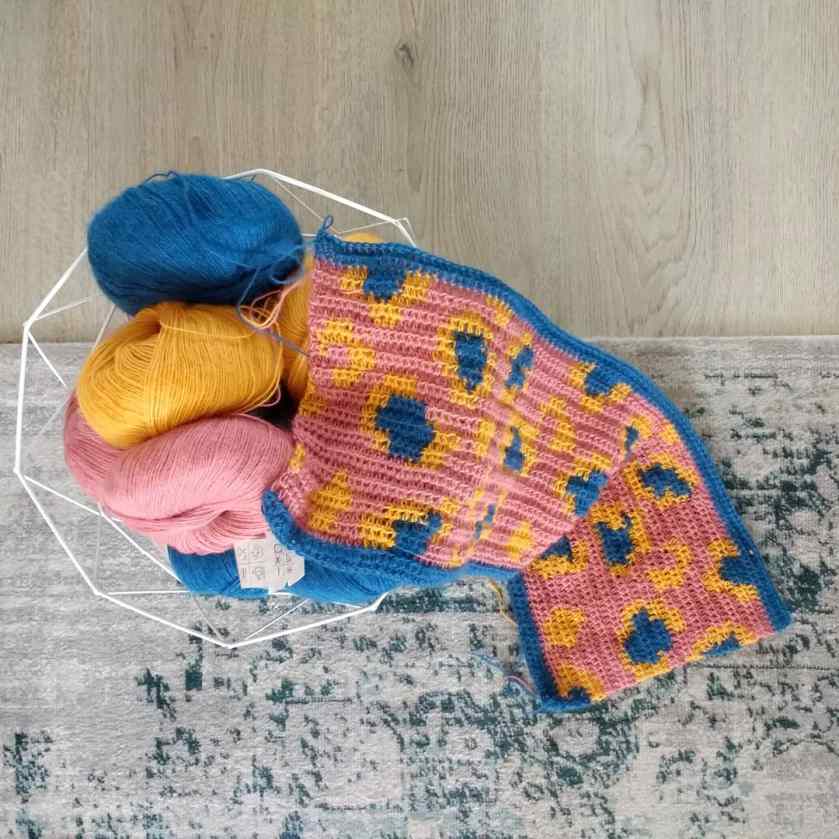
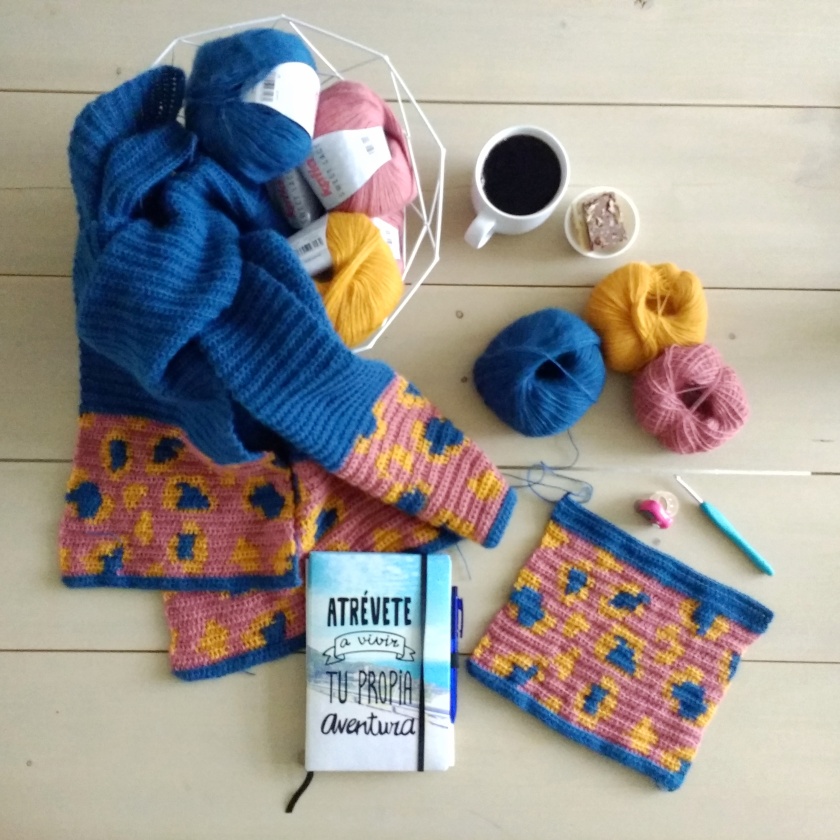
Nog niet zo lang geleden werd ik verliefd op Tunisch haken. ‘Gewoon’ haken is mijn eerste grote liefde, maar tunisch haken is toch een stiekeme nieuwe crush. En toen Hobbii.nl mij de prachtige bollen Snowstorm garen stuurde in de kleur Icey blue, wist ik vrijwel direct wat ik ermee wilde doen: Tunisch haken!

Not so long ago, I fell in love with Tunisian crochet. ‘Regular’ crochet is still my first true love, but tunisian crochet is a secret new crush. So when hobbii.nl sent me the lovely skeins of Snowstorm in the colour Icey Blue, I knew quite quickly what I wanted to do with it: tunisian crochet.

img_20181103_155606048.jpg

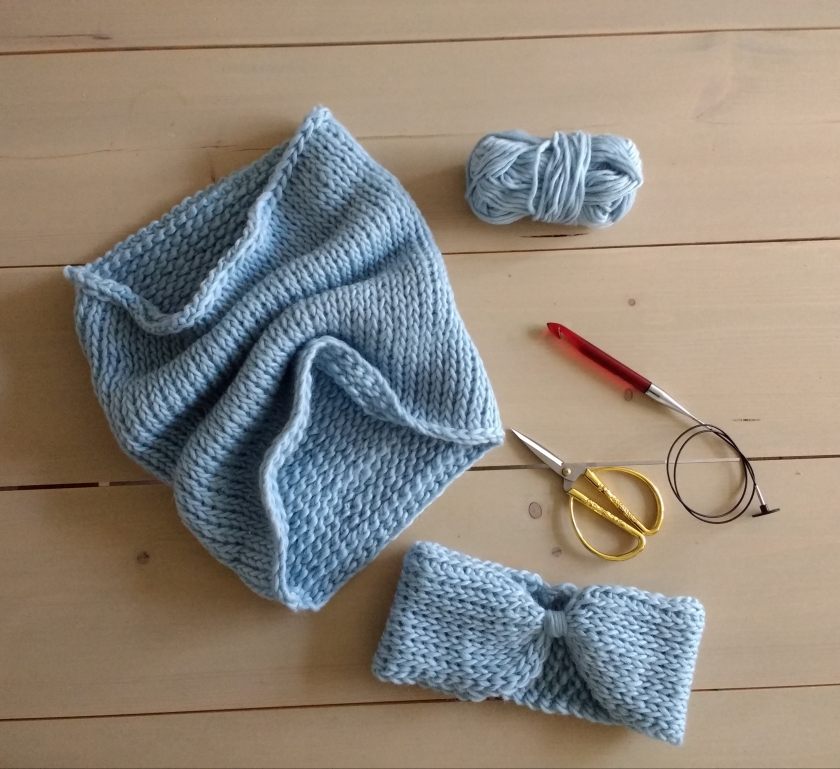
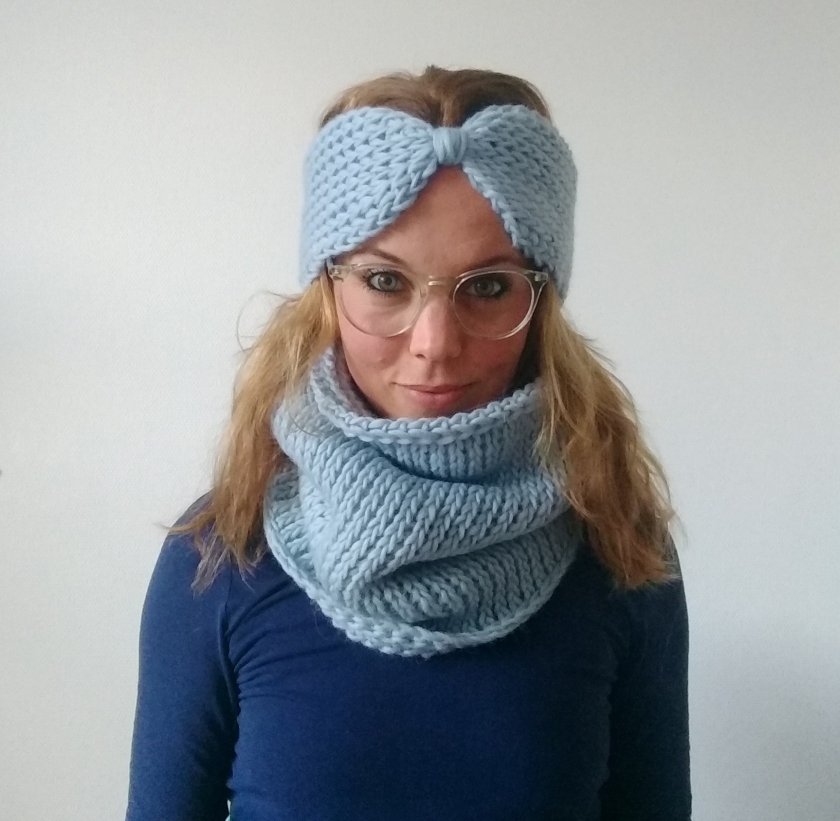
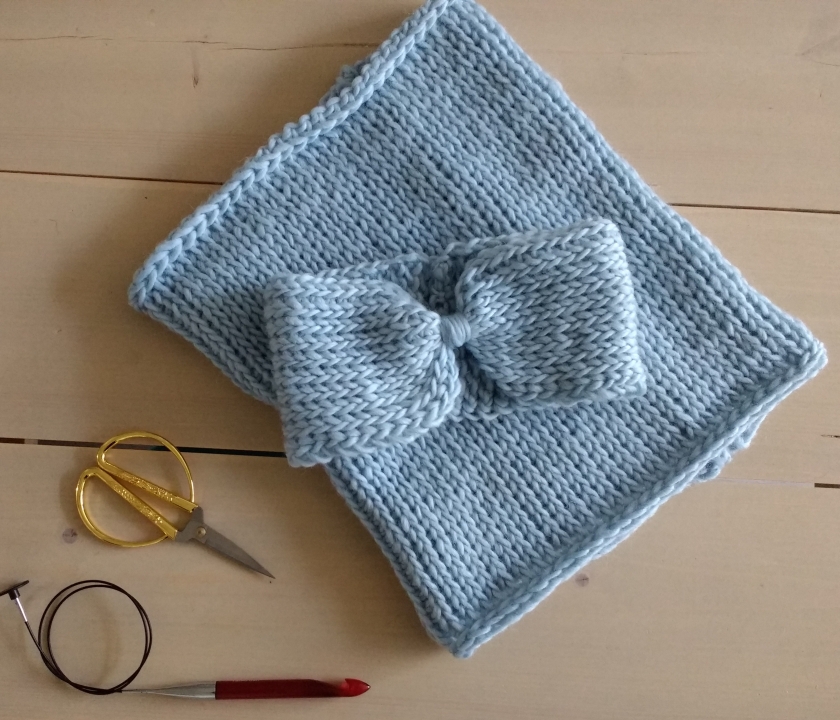
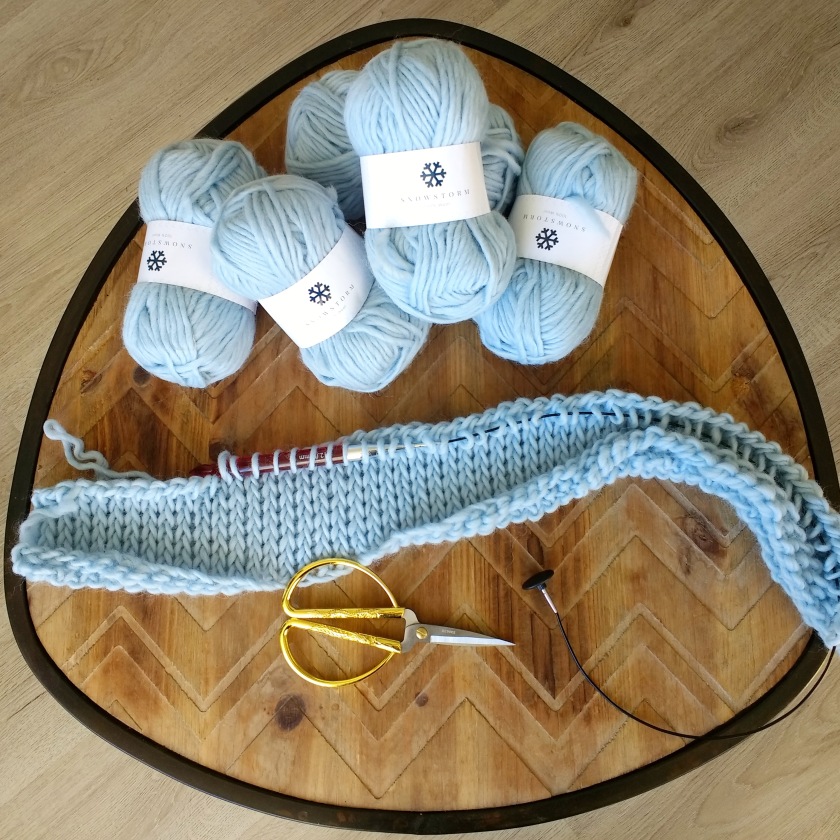
En dus ontwierp ik een fijn setje: een grote, chunky colsjaal en een heerlijke, warme haarband. De Tunische tricotsteek geeft een heel fijn, bijna gebreid effect aan het werk. Grote stappen, snel thuis – daar hou ik wel van. De wol is dan ook lekker dik en ik werkte met naald 12mm, waardoor ik heerlijk snel opschoot. En omdat de Snowstorm gemaakt is van 100% wol, blijf ik gegarandeerd warm deze winter!

Ook zo’n leuk setje maken? Dat kan! Hieronder leg ik stap voor stap uit hoe je de sjaal en de haarband maakt. Snowstorm is er in vijftien heerlijke kleuren, dus voor elk wat wils!

And so I designed this wonderful set: a big, chunky cowl and a wonderfully warm headband. The tunisian knit stitch makes the items look almost knitted. I love projects that are quick and easy and because this yarn is nice and big, made for hooks 10mm (N hook), it works up amazingly fast! Snowstorm is made of 100% wool, so you’ll be guaranteed to stay warm all winter long!

Want to make such a fun set for yourself? You can! Scroll down to the step by step English instructions to make the scarf and headband. Snowstorm comes in fifteen lovely colours, so you get to make it completely to your own tastes!


IMG_20181103_155105508_BURST000_COVER_TOP


Snowstorm colsjaal – patroon

Benodigdheden:

  • 5 bollen Snowstorm
  • Tunische haaknaald 12 mm
  • verlengkabel Tunische haaknaald van minstens 40cm
  • schaar


Stap 1.
Maak een ketting van 56 lossen. (als je je colsjaal losser wil laten vallen, zet je meer lossen op)

Stap 2.
Begin in de 2e losse vanaf de haaknaald. Steek de naald in de losse, sla de draad om de naald heen en haal de draad mee naar voren. Laat de lus op de naald staan. Je hebt nu 1 lus opgehaald. Er staan, inclusief de 1e lus, nu 2 lussen op je naald.

Stap 3.
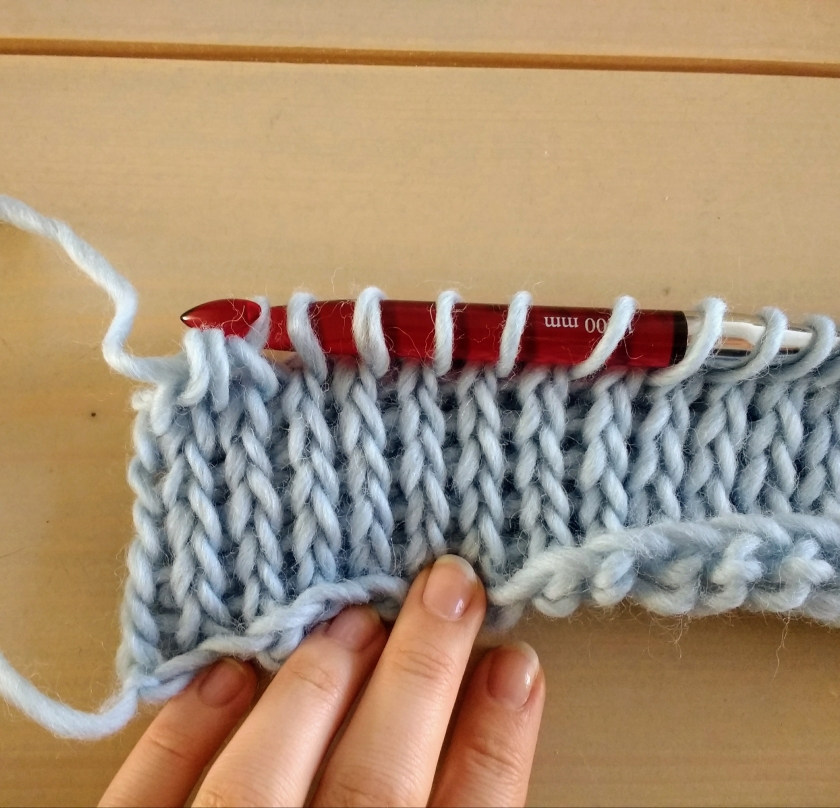
Herhaal stap 2 tot het einde van de lossenketting. Er staan 56 lussen op je naald en kabel. Om terug te gaan, maak je de Standaard Rij Terug (SRT). Sla de draad om de naald, haal door 1 lus, *sla de draad om de naald, haal door 2 lussen*. Herhaal van * tot * tot je aan het einde van de rij komt. De laatste lus laat je op de naald staan.

LET OP: je keert je werk dus niet om!

Stap 4.
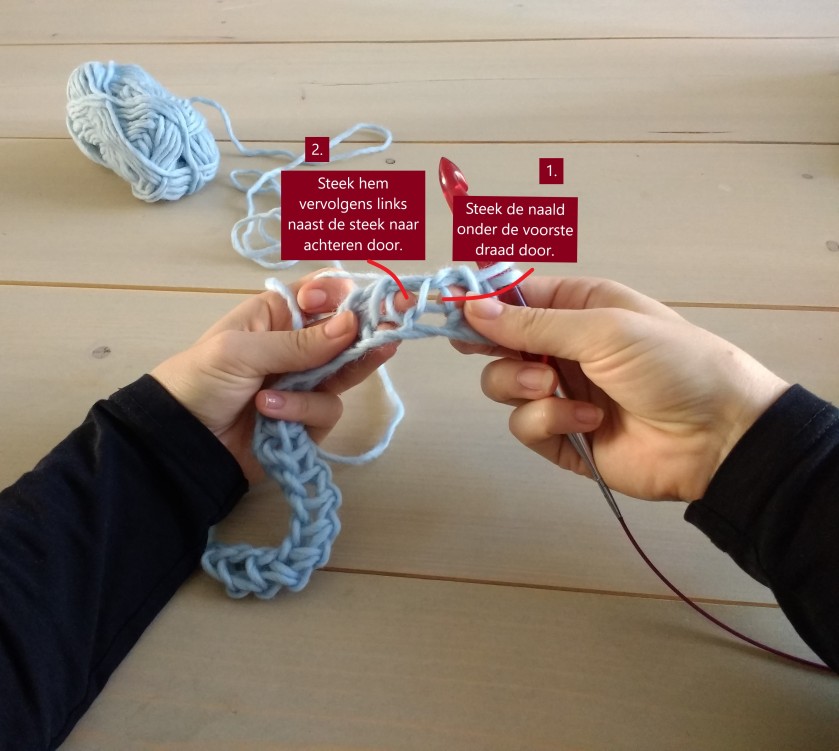
Vanaf nu gaan we de tricotsteek haken. Sla de eerste lus van de vorige rij over. In de 2e lus, steek je de naald onder de voorste draad door, vervolgens steek je hem in de tussenruimte tussen de 2e en de 3e lus naar achteren. Hiervandaan haal je een draad op. Deze draad neem je via dezelfde weg helemaal terug naar voren, dus door de lossenruimte tussen de 2e en de 3e lus en onder de voorste draad van de 2e lus door. Laat de draad op de naald staan en ga verder naar lus 3.

*steek je naald onder de voorste draad door, steek hem vervolgens in de tussenruimte aan de linkerkant van de lus naar achteren. Sla de draad om en neem hem mee naar voren*

Herhaal van * tot * tot het einde van de rij. In de laatste steek: steek de naald achter de buitenste twee draden van de laatste steek in, sla de draad om de naald, neem hem mee naar voren en laat hem op de naald staan.

IMG_20181105_102944116

Stap 5.
Maak de SRT

Stap 6.
Herhaal stap 4 en stap 5 tot de col de gewenste hoogte heeft. De mijne is 35 cm hoog. Maak 1 losse. Haak langs de bovenrand een rij halve vasten. Klap je col dubbel, met de goede zijde aan de binnenkant. Haak de zijnaden samen met halve vasten. Keer de col vervolgens met de goede zijde naar buiten. Maak 1 losse. Haak langs de onderrand een rij halve vasten. Hecht af en werk de draad weg.


IMG_20181103_154121712

Snowstorm haarband – patroon

Benodigdheden:

  • 1 – 2 bollen Snowstorm
  • Tunische haaknaald 12 mm
  • verlengkabel Tunische haaknaald van minstens 10cm
  • schaar

Stap 1.
Maak een ketting van 11 lossen.

Stap 2.
Begin in de 2e losse vanaf de haaknaald: haal 10 lussen op. Er staan nu 11 lussen op de naald.

Stap 3.
Maak de SRT (stap 3 van de colsjaal)

Stap 4.
Begin in de 2e lus van de vorige rij.

*steek je naald onder de voorste draad door, steek hem vervolgens in de tussenruimte aan de linkerkant van de lus naar achteren. Sla de draad om en neem hem mee naar voren*

Herhaal van * tot * tot het einde van de rij. In de laatste steek: steek de naald achter de buitenste twee draden van de laatste steek in, sla de draad om de naald, neem hem mee naar voren en laat hem op de naald staan.

Stap 5.
Maak de SRT.

Stap 6.
Herhaal stap 4 en 5 tot je 19 – 23 rijen hebt gehaakt, afhankelijk van hoe groot je hoofd is en hoe strak je haakt. Meet af of de haarband vanaf het midden van je achterhoofd tot aan je slapen reikt. Wanneer dit het geval is, begin je met minderen bij stap 7.

img_20181105_104315427.jpg

Stap 7.
Vanaf nu gaan we drie rijen minderen. Dit doen we op de terugweg. Haal dus 10 lussen op. Laat de 1e lus gewoon afglijden. Laat nu 3 lussen afglijden in plaats van 2. Maak de SRT tot er nog 4 lussen op je naald staan. Sla de draad om, laat 3 lussen afglijden, sla de draad om, laat 1 lus afglijden. Houd 1 lus op je naald staan.

Herhaal stap 7 nog 2 keer. Op de heenweg, wanneer je lussen ophaalt, steek je de naald achter de 2 lussen langs die je net tegelijkertijd hebt af laten glijden, en steekt hem aan de linkerkant van deze samengehaakte steek in. Zo minder je steeds 2 lussen per rij.

Stap 8.
Haak 1 heenweg en SRT ‘normaal’. Je hebt in totaal 5 steken.

Stap 9.
We gaan nu meerderen. Dit kan met Tunisch haken op meerdere manieren. Ik heb voor de gemakkelijkste manier gekozen:

Steek de naald tussen de 1e en de 2e lus in en haal een draad op. Maak nu de standaard tricotsteek tot je bij de laatste lus aankomt. Steek de naald in tussen de één na laatste en de laatste lus en haal de draad op. Steek hem vervolgens zoals gewoonlijk, achter de buitenste twee draden van de laatste lus door, en haal de draad op. Je hebt nu 2 extra lussen op je naald. Maak de SRT.

Doe dit weer 2 keer, tot je weer 11 lussen in totaal op je naald hebt staan.

Stap 10.
Haak nog 19 – 23 rijen (afhankelijk van hoeveel je bij stap 6 hebt gehaakt) met de standaard tricotsteek. Haak de twee uiteinden samen met halve vasten.

Stap 11.
Wikkel een losse draad om het smalste gedeelte van je haarband heen, zo vaak als je zelf wilt. Hecht af en werk de losse draadjes weg.


IMG_20181103_155312340_BURST000_COVER_TOP

Snowstorm cowl – pattern EN

Materials:

  • 5 skeins of Snowstorm
  • Tunisian hook 12 mm (size O)
  • extension cable for tunisian hook, at least 40cm
  • scissors


Step 1.
Make a chain of 56 stitches. (If you want your scarf to fall a bit wider, make your chain longer.)

Step 2.
Starting in the 2nd chain from your hook. Insert your hook into the chain, yarn over, pull up a loop. Leave that loop on your hook (you’ll have 2 loops on your hook now) and insert into the next chain.

Step 3.
Repeat this until you reach the end of your chains. You’ll have 56 loops on your hook and cable. To go back, we make the Regular Return Pass (RRP):

Yarn over and pull through 1, *yarn over and pull through 2*. Repeat from * to * until you reach the end of the row. Leave 1 loop on your hook.

NOTE: with tunisian crochet, you do not turn your work!

Step 4.
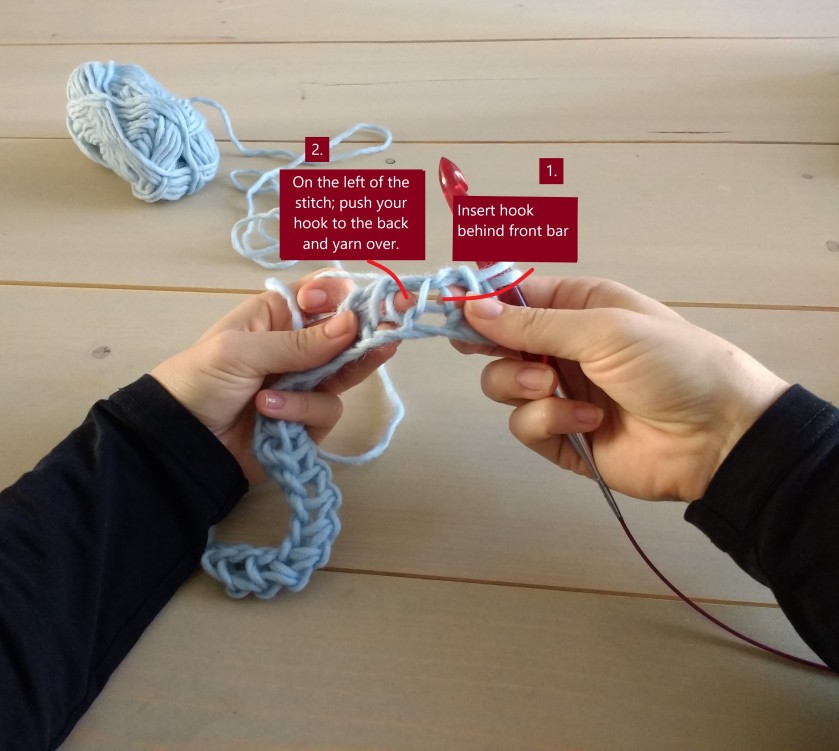
From this point, you’ll start with the tunisian knit stitch. Skip the first loop of the previous row. In the 2nd loop, insert your hook behind the front bar of the loop, from right to left. Then push your hook to the back in the space between the 2nd and 3rd loop. Yarn over and pull through to the front. Take the same route back; through the space between the 2nd and 3rd loop, behind the front bar of the 2nd loop from left to right and to the front. Leave the loop you’ve just pulled up on your hook. And continue on to loop 3.

*Push your hook behind the front bar of the loop, push it to the back on the left side of this loop, yarn over and take your yarn all the way to the front*

Repeat from * to * until you reach the end of the row. In the last stitch: insert your hook behind the outer two bars of the last stitch, yarn over and pull through.

IMG_20181105_102944116

Step 5.
Make the RRP

Step 6.
Repeat step 4 and 5 until the scarf has the desired heigth. Mine is 35cm, or 14 inches high. Chain 1. Crochet slip stitches all along the upper edge. Fold the col with the right side in and stitch it together with slip stitches. Fold it with the right side out and make slip stitches along the lower edge. Fasten off and sew in the loose threads.


IMG_20181103_154121712

Snowstorm headband – pattern

Materials:

  • 1 – 2 skeins of Snowstorm
  • Tunisian hook 12 mm (size O)
  • extension cable for tunisian hook, at least 10cm
  • scissors

Step 1.
Chain 11.

Step 2.
Starting in the 2nd chain from your hook: pull up 10 loops. There are 11 loops on your hook now.

Stap 3.
Make the RRP (step 3 of the cowl)

Step 4.
Start in the 2nd loop of the previous row.

*Push your hook behind the front bar of the loop, push it to the back on the left side of this loop, yarn over and take your yarn all the way to the front*

Repeat from * to * until you reach the end of the row. In the last stitch: insert your hook behind the outer two bars of the last stitch, yarn over and pull through.

Step 5.
Make the RRP.

Step 6.
Repeat step 4 and 5 until you’ve made 19 – 23 rows, depending on the size of your head and the tension in your work. Measure whether you’re nearing the middle of your headband, by wrapping your work from the middle of the back of your head to your temple. It’s okay to have a tiny bit of stretch in the work to reach your temple. By wearing it, the headband will stretch a little in the end anyway. When you’ve reached your temple, start decreasing at step 7.

img_20181105_104315427.jpg

Step 7.
From here we’ll decrease for 3 rows. We’ll decrease in the return passes. So first pull up 10 loops. Let the 1rst loop slide off. Now let 3 loops instead of 2 slide off. Make the RRP until there are 4 loops on your hook left. Yarn over and let 3 loops slide off, yarn over and let 2 loops slide off. Keep the last loop on your hook.

Repeat step 7 2 more times. On your right to left row, while pulling up loops, push your hook behind the front bars of the 2 loops you let slide off together in the last row. Then push it on the left side of these 2 loops to the back, yarn over and take a loop up to the front. This is how you decrease 2 stitches each row.

Step 8.
Make 1 ‘normal’ row, including the RRP for a total of 5 stitches.

Step 9.
From here we’ll start increasing. With Tunisian crochet, there are a number of ways to inrease. I’ve chosen the easiest way for this project:

Insert your hook in the space between the 1rst and 2nd loop, push it to the back and pull up a loop. Now continue with the standard Knit stitch until you reach the last loop. Insert your hook between the second to last and the last stitch, push it to the back and pull up a loop. Insert your hook behind the outer 2 bars of the last stitch and pull up a loop. Make the RRP. You’ve now increased 2 stitches.

Repeat this 2 times, until you’ve reached a total of 11 loops on your hook again.

Step 10.
Make another 19 – 23 rows (the same amount you made at step 6) with the standard Knit stitch. Stitch the two ends of your headband together with slip stitches.

Step 11.
Wrap a strand of yarn around the smallest part of your headband, as many times as you like. Cut yarn, fasten off and sew away all loose ends.

IMG_20181028_122610_094

Geplaatst in Geen categorie

Candy Cane Cardigan

Opeens had ik een idee in mijn hoofd. Ik zag een kort vest voor me, met pofmouwen en twee verschillende kleuren. Roze en rood moest het worden en ik wilde dolgraag de tunische ‘full stitch’ gebruiken. Die had ik al een aantal keer in een sjaal gebruikt (zie de foto in de header; de Ton-sur-Ton sjaal van ByClaire) en het leek me fantastisch om hem in te zetten in een ander ontwerp.

The thought came to me all of a sudden. In my mind I saw a mid length cardigan, with poofy sleeves and two different colours. It had to be pink and red and I loved to incorporate the tunisian ‘full stitch’. I had used that stitch a couple of times for a shawl (see picture in header; the Ton-sur-Ton sjaal by ByClaire) and I thought it would be fantastic to use it for another design!


En ineens kwam het Candy Cane vest tot leven! Al tijdens het haken van het achterpand dacht ik; Dit. Is. Het! Ik kon er niet omheen. Het was toen al prachtig. En ik wist dat ik er een patroon van moest maken. Dit kon ik niet alleen voor mezelf houden!

And suddenly the Candy Cane Cardigan came to life! While I was making the back panel I already knew: This! Was! It! I couldn’t escape it anymore. It was already looking amazing. And I knew I had to make it into a pattern. I couldn’t just keep all this goodness to myself!

IMG_20180922_145016_581

‘Maar Tunisch haken? Dat is toch veel te ingewikkeld? Ik ben daar nog lang niet goed genoeg voor, dat kan ik helemaal niet!’ Daar heb ik maar 1 ding op te zeggen; Natuurlijk wel! Tunisch haken is helemaal niet zo moeilijk (heel erg makkelijk zelfs) en wanneer je de steek eenmaal onder de knie hebt, haakt dit patroon heerlijk weg! Ik heb in het patroon stap voor stap en aan de hand van foto’s uitgelegd hoe je tot die tunische full stitch komt en wanneer je die stappen goed volgt, kan jij het ook. Echt waar. Zelfs jij. Dat beloof ik.

But tunisian crochet? That’s way too complicated, right? I’m so not good enough for that, I can’t possibly do that!’ To which I can only say 1 thing; You absolutely can! Tunisian crochet really isn’t that hard (it’s rather easy, really) and when you’ve mastered the stitch, this pattern will work up like a dream! I’ve explained step by step and with a lot of pictures how to make the gorgeous tunisian full stitch. So when you follow those steps, you can do it too. Really. Even you. I promise.

IMG_20180929_184008491

Dankzij input van mijn geweldige Instagramvolgers, kwamen er twee versies van de mouwen tot stand. De pofmouwen die ik origineel in mijn hoofd had en waar ik verliefd op was geworden, en de taps toelopende mouwen die ook een plekje in mijn hart veroverden. En beiden kregen een plaatsje in het patroon.

Thanks to the input of my Instagram followers, I designed two variations of the sleeves. The poofy sleeves that I originally had thought of and fell in love with, and the tapered sleeves that conquered a special spot of my heart as well. And both sleeve variations made their way into the pattern.


Het uitgewerkte patroon ging naar een aantal geweldige testhaaksters, die mij hielpen met de foutjes en onduidelijkheden. Dankzij hun input durf ik te zeggen dat dit een overzichtelijk, helder en mooi patroon is geworden. Helemaal voor jullie!

The written pattern went off to a couple of awesome test crocheters that helped me work out any errors or uncertainties. Thanks to their input I dare to say that it has become a clear and beautiful pattern. All for you!


Je kunt het patroon (voor maten S, M en L en mogelijkheden tot vergroten of verkleinen) op Ravelry vinden door HIER te klikken. Het patroon op Etsy vind je HIER. Wanneer je aan het werk gaat met mijn patroon, hoor ik dat heel graag! Gebruik je Instagram? Tag @liefsvansuus_ in je foto’s of bericht en gebruik de hashtag #candycanecardigan. Ik zie de foto’s heel graag tegemoet!

You can find the pattern (for sizes S, M and L – and options to increase or decrease) on Ravelry by clicking HERE. For the pattern on Etsy, click HERE. When you download my pattern and start working on it, I really do love to know! Are you on Instagram? Tag @liefsvansuus_ in your picture or message and use the hashtag #candycanecardigan. I can’t wait to see your creations!


Geplaatst in crochet, Patronen, patterns

Basic Back Loop Beanie

Mijn beste vriendin had een leuk setje sjaal en wanten gekocht voor haar kleine druif. Het enige dat nog aan zijn winteroutfit ontbrak, was een goede muts. En laat ik die nou net kunnen maken!

My best friend bought a cool set of scarf and mittens for her baby boy. The only thing missing from his winter wonder outfit, was a good hat. And that, of course, was one thing I could remedy!

img_1539677601420

Ik maakte een in de basis vrij simpele, geribbelde muts voor hem, in de kleuren van zijn sjaal en wanten. Ik maakte er een leuke, nepbonten pompon bij en gaf de muts nog een leuke accentkleur als afwerking. En klaar was Kees! (of Suus, in dit geval.) Een geweldige basic beanie voor mijn favoriete kleine druif!

Het leukste van deze muts is wel dat je hem in iedere maat, iedere kleur en voor iedereen kunt maken. Volg het stappenplan hieronder en maak je eigen Basic Beanie!

I made a quite simple basic ribbed beanie for him, in matching colours to his scarf and mittens. I made the fun, faux-fur pompom myself and added a nice trim in an accent colour. Easy as pie! (or well, as a beanie, in this case.) A wonderful basic beanie for my favourite friend!

The best thing about this beanie is that you can literally make it in any size or colour you’d like, for anybody. Just follow the steps below and make your own Basic Beanie! (scroll further down for English)

IMG_20181016_102202332

BENODIGDHEDEN

  • 50 – 150 gr. Garen voor naald 5 mm Kleur A. (ik gebruikte Phil Aventure van Phildar)
  • 50 – 150 gr. Garen voor naald 5 mm Kleur B.
  • Restje garen voor accentkleur
  • Haaknaald 5 mm
  • Stopnaald
  • Pompon


AFKORTINGEN

  • l = losse
  • hv = halve vaste
  • v = vaste
  • hst = half stokje
  • hstal = half stokje in alleen de achterste lus:

“Sla de draad om, steek hem alleen door de achterste lus van het v-tje, haal de draad op en haal hem mee naar voren. Sla de draad nu nog een keer om en haal hem in één keer door de 3 lussen op je naald.”

IMG_20181217_124555453

MAATVOERING

Om de juiste maat beanie te maken voor iedereen, moet je de volgende dingen doen:

  • Neem de hoofdomtrek op (in het voorbeeld was dit ongeveer 47cm). Omdat de beanie elastisch wordt, haal je daar minimaal 8cm vanaf. Dit wordt de breedte voor je muts.
  • Trek minimaal 10 cm van de hoofdomtrek af. Dit wordt de lengte voor je muts. Dit lijkt heel lang, maar je wil voldoende ruimte overhouden om de muts om te kunnen slaan.
  • Nu je de breedte en de lengte van je werk weet, kun je aan de slag!

WERKWIJZE

  1. Zet in Kleur A. zoveel lossen op als nodig is om tot je lengtemaat te komen. Maak 1l extra.
  2. Beginnend in de 2e l vanaf je haaknaald: hst tot het einde van je lossenketting.
  3. Hecht Kleur B. aan. Haak 1 hstal in ieder hst.
  4. Hecht Kleur A. aan. Haak 1 hstal in ieder hstal.
  5. Hecht Kleur B. aan. Haak 1 hstal in iedere hstal.
  6. Herhaal stap 4 en stap 5 tot je werk de juiste breedte heeft bereikt.

 img_20181014_142916822.jpg

  1. Kies welke kant van je werk je aan de binnenkant wil hebben en welke als buitenkant gaat gelden. Klap de muts dubbel met de buitenkant naar binnen toe. Haak met hv de beide zijkanten aan elkaar. Hecht af, maar laat een lange draad over om de muts te sluiten.
  2. Werk nu alle losse eindjes af. Omdat je steeds van kleur hebt gewisseld, zijn dit er véél!
  3. Pak de lange draad op die je over hebt gehouden bij stap 7. en haal hem door de stopnaald. We gaan nu de bovenkant van de muts sluiten. Steek de naald aan de bovenkant in iedere rij. Steek de naald de ene keer van binnen naar buiten en vervolgens van buiten naar binnen in. Trek steeds goed aan. De bovenkant van de beanie trekt nu steeds meer naar elkaar toe.
  4. Als je het hele rondje af hebt, blijft er nog een klein gat over. Naai dit gat met een paar steken dicht. Hecht af.

  IMG_20181016_102304508

  1. Klap de onderste rand om. Nu gaan we met de accentkleur een randje om deze rand haken. Hecht de accentkleur aan bij de achternaad. Maak in iedere rij een v. Dit is gelukkig makkelijk te zien, omdat iedere rij hstal wisselt van kleur.
  2. Wanneer je rond bent, sluit je de cirkel met een hv in de 1e v, hecht af en werk de draad weg.


  1. Naai nu de pompom bovenop de muts. Zet deze goed vast zodat hij niet gaat wiebelen of er gemakkelijk afvalt.


Et voilá! Je zelfgemaakt Basic Beanie!


img_20181015_151522951.jpg

English pattern

MATERIALS

  • 50 – 150 grams yarn for hooksize 5 mm (H hook) Colour A. (I used Phil Aventure byPhildar)
  • 50 – 150 grams yarn for hooksize 5 mm (H hook) Colour B.
  • Bit of rest yarn for accent colour
  • Crochet hook 5 mm / H hook
  • darning needle
  • Pompom

ABBREVIATIONS (US TERMS)

  • ch = chain
  • sls = slip stitch
  • sc = single crochet
  • hdc = half double crochet
  • hdcbl = half double crochet back loops only:

“Yarn over, insert hook into stitch. Make sure you only insert it into the back loop of the v-shape stitch! Pick up yarn, take it with you to the front of your work. Yarn over and pull through all 3 loops on your hook.”

SIZING

To get the size of the beanie just right, do the next couple of things:

  • Take the circumference of the head (in the shown beanie it was aprox. 47cm). Because the beanie will be a little stretchy, substract at least 8cm (or 4 – 5 inch) of this number. This will be the width of your beanie.
  • Substract at least 10cm (or 6 inch) of the circumference. This will be the length of your beanie. This may appear to be extremely long for a hat, but you want to keep enough material to turn a flap up.
  • Now that you have the width and length of your beanie, you can begin!


IMG_20181016_102243288

INSTRUCTIONS

  1. With colour A. : make a chain as long as the length you need. Ch1 extra.
  2. Starting in the 2nd ch from your hook: hdc into each ch until the end of your row.
  3. Attach colour B. Make 1 hdcbl in each hdc.
  4. Attach colour A. Make 1 hdcbl in each hdcbl.
  5. Attach colour B. Make 1 hdcbl in each hdcbl.
  6. Repeat step 4 and step 5 until you reach the right width of your work.

  IMG_20181211_113525166

  1. Choose which side you’d like to be the outside of your beanie. Fold the beanie with the outsides in. With sls, crochet the sides of the beanie together. Fasten off, but leave a long tail.
  2. Weave in all the ends. As you’ve changed colour every row, there will be A LOT of those. (sorry.)
  3. Take up the long tail you left at step 7. Pull it through the darning needle. Now you’ll close the top of the hat. You’ll sew all around the top and pull it tight to close. Do this by inserting the darning needle from the outside to the inside in one stitch, and from the outside to the inside on the next. Pull tight all the way around. The beanie will start to close.
  4. When you’ve finished the cirle, there will probably be a hole left. Sew this hole shut with a couple of stitches. Fasten off.


IMG_20181015_115038021

  1. Now fold the lower flap up. You’ll attach the accentcolour to that lower part. Start at the seam in the back and make a sc into the top of each row of hdcbl. You can easily see where to insert your hook, as each row changes colour.
  2. At the end of your round, close the circle with a sls in the first sc and fasten off.  
  1. Attach the pompom on top of the hat. Make sure to secure it tightly, so that it won’t bobble while wearing.


Et voilá! Your handmade Basic Back Loop Beanie is done!

Geplaatst in crochet, Haken, Patronen, patterns

FLAMINGO KIMONO

Ik ben niet zo van de vierkantjes. Soms zie ik mooie granny squares voorbij komen, haak ik er een aantal van en denk ik vervolgens: ‘Oké, en nu?’ Maar vorig jaar zomer had ik enthousiast koraalrood garen ingeslagen om ‘iets van een zomertrui ofzo’ mee te maken en dat lag nu nog altijd verleidelijk naar mij te knipogen vanuit de kast. En voor ik het wist haakte ik een vierkantje. En toen nog één. En nog één.

I’m not usually a big fan of crocheting squares. Sometimes a pretty granny square catches my eye and I make a few, only to think within a few moments: ‘okay, now what?’. But I still had some beautiful coral coloured yarn in my stash from the time last summer I thought of making ‘a summer jumper or something’ and I couldn’t resist it anymore. Before I knew it, I crocheted a square. And another one. And another one.

IMG_20180227_091452_392

Deze prachtige vierkantjes vroegen natuurlijk om een toepassing en met het eerste dappere lentezonnetje door de ramen, besloot ik er een gemakkelijk vestje van te maken. Een kimono-vestje, zo eentje die je altijd en overal aankunt. Gewoon over een t-shirt of topje, over een simpel jurkje en zelfs op het strand over je bikini. Multi-inzetbaar en heerlijk zomers!

These wonderful squares obviously demanded to be used and with the first brave rays of sunshine through the windows, I decided to try and make an easy cardigan. A kimono cardigan. A cardi you can wear anytime, anywhere; just on top of a top or t-shirt, over a simple little dress or even on top of your bikini on the beach. Multi-purpose and with a wonderfully summery feel!

IMG_20180318_154615_154

En voor het eerst in mijn leven dacht ik gewoon eens even na bij wat ik deed: ik heb notities bijgehouden! En dus is er voor het eerst in mijn leven ook een heus patroon ontstaan! In drie maten: XS/S , M/L en XL. Door op de link hieronder te klikken, download je het bestand en kun je zelf aan de slag met je eigen Flamingo Kimono!

And for the first time in my life I actually used my brain: I kept notes! And so for the first time in my life, I have made my own crochet pattern! The pattern comes in three sizes: XS/S, M/L and XL. The English version is written in US terms. By clicking on the link, you download the PDF file and you get to make your own Flamingo Kimono!


IMG_20180313_103639_317

LET OP: dit is een gratis patroon en je mag het zo vaak gebruiken als je zelf wilt. Voel je vrij er kimono’s voor jezelf, je buurvrouw, de schoolklas van je dochter of het hele dorp mee te maken, maar verwijs online altijd naar mij (instagram: @liefsvansuus_ en facebook: facebook.com/liefsvansuus / @liefsvansuus) en gebruik de hashtag #flamingokimono.
NOTE: this is a free pattern and you can use it as many times as you like. Please feel free to make kimonos for yourself, you nextdoor neighbour, your daughter’s class of even the entire town, but please always refer to me online (instagram: @liefsvansuus_ and facebook: facebook.com/liefsvansuus / @liefsvansuus) and use the hashtag #flamingokimono.

De Flamingo Kimono – patroon Nederlands

Flamingo Kimono – pattern English

Kimono Flamingo – Patrón Español